IDEAS TO MAKE IT YOUR OWN
While my passion dictates there can never be too many knots, sometimes for
aesthetic purposes, less is more. You will need to decide. I would advise a
tentative application at first, until you see what the effect is, so that you
can determine how much you want to see and embellish this object of your desire.
Experiment with color, thickness, type, mixture, texture, and form until you are
more familiar with the base on which you are working or the stand-alone object
you create. From this you may then determine (or perhaps you knew all along!)
what would be most suited to your task, so that you can feel confident in
creating your own masterpiece. Decorative knotting is my unbridled passion—I
cannot get enough of decorative knots! Along the way, I learned several
techniques when I had no idea what this passion might involve. I have found new
and exciting tools to use. I have come across cords and twines in the most
unusual places, and a visit to a museum usually involves me traipsing off to
look at some example of knotting that I might find, whether it is made of stone,
brass, iron, silk, leather, ribbon, cotton, or just plain manila or hemp rope.
When I visit a town that is new to me, I try to find the place that has cords or
twine, perhaps a grocery store, a hardware store, or a crafts store. I also look
for the museums in town and the ideas they may hold, whether it is an
agricultural museum, a car museum, a textile museum, or a natural history
museum. Finding that there may be someone in town who shares this passion is a
heaven-sent opportunity for me to learn more and to absorb more of the lore that
draws me into its web (pun intended!). Last, and by no means least, whenever I
find a book about knotting or a related subject I try to add it to my
ever-growing collection (one of my latest acquisitions is a book about goat
roping—don’t even ask). I estimate that I now own more than 2,700 books,
magazines, pamphlets, serials, journal articles, and other pieces of written
material about knotting. It really is my favorite subject. It is my sincere wish
that you will find the same joy as you browse this article or delve into its
detail.
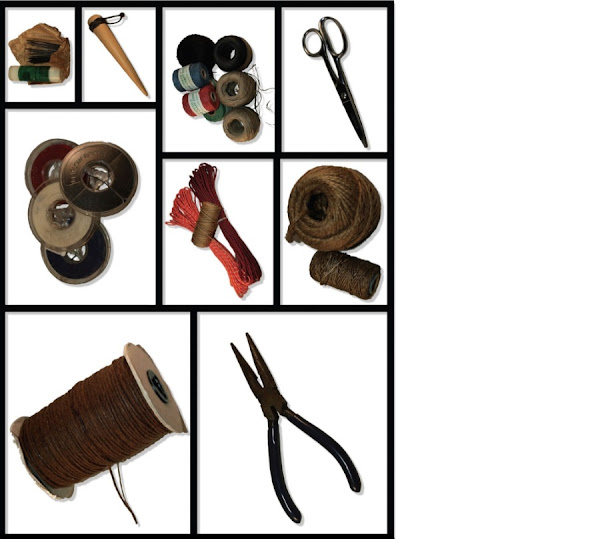
List of Items shown below
List of Items shown below
MATERIALS, METHODS, AND TOOLS
There are too many places where materials may be obtained for me to show them all; you may find some other place near you that is a good source—just keep your eyes peeled for an opportunity! The Internet is a great resource in that respect. If you do not have Internet access, there is enough information in the back of this book to enable you to inquire by mail to one or more companies to start the ball rolling. If you take the initiative to join a group such as the International Guild of Knot Tyers, the International String Figure Association or the Basketmakers Guild, I feel sure you will find a contact, perhaps nearby, who can help you. Good luck!
MATERIALS
Materials! I usually field many questions about materials when I demonstrate knotting. What should I use and where will I find some? Surely they don’t still make that, do they? What do I do with it when it is finished? Where should I store it? Does this stretch, shrink, burn, fade, or do anything else in reaction to stressors? What colors, finishes, types, and thicknesses are available? Are there special glues, lacquers, varnishes, or coatings that I should or should not use? These are all typical questions, and are proper for those starting out.
There are many materials one can use to create knots and knotted articles. Artists have used everything from carbon fiber to hempen cord. A few of the more common materials are examined here. These are leather, cord, wire, line, plastic, and natural fibers. You will learn what to use them for and where to get them, how to treat something you’ve made with them, and any potential problems their use implies.
A word about the construction of cords and lines: Some are known as laid cords or line. These are cords made by twisting the original fibers into yarns. Those yarns are subsequently twisted in the opposite direction into strands. Then the strands are twisted together, again in the opposite direction, into lines or cords. The final twist may be described as left laid (known in the trade as S-laid because a left-laid cord’s strands appear to follow the stroke of the letter S) or they may be right-laid, which is the most common form (also known as Z-laid). You should note that cords may be simply described on the store shelves as twisted; you should examine this yourself to determine the way in which they were constructed.
METHODS
The question I’m asked most often is “How can I make these beautiful pieces?” First-time or novice knotters will say,“I have never done it before,” or, “You must have so much patience!” when they see finished works by others. Each of us starts at the exact same point—the point of being interested in what you see and wanting to make something like it for yourself. Experienced knotters are not blessed with any superhuman skills or abilities, we simply apply ourselves for the time it takes for us to get bored, tired, or annoyed with what we are doing and then we stop—just like everyone else! It is really not about patience, although having patience does help. It is more a question of determination, doggedness, and whether you want an end result that is perfect, near-perfect, or an interpretation. Do try to remember that this is supposed to be fun. Once it stops being fun, you can stop and come back to it later. The second most popular question is “How long did it take to make that?” This is an important thing to think about when making something for sale, but can be a little insulting when asked of someone who has just spent over forty hours making something for display. If you are making it for yourself or for a demonstration, the question is not quite as important, but for a novice, it is important to know how much time making something takes. Time is a common measure for many people and the question of how long it takes to make something can be translated to “How much time will this take away from something else I want to do?” so that the person asking can relate to what involvement they want to have or whether it is better to have someone else make the piece—maybe you! It also enables the person to place a value on what is being offered—if it takes an expert ten minutes to make something then some people will relate that to what they consider an appropriate hourly rate to be for the craft or art and determine what value they would place on the finished article. Something that took you eighty hours to make may not have the same value for the buyer, because they perhaps do not realize the time it takes to make something like this and they may be unaware of its complexity.
Here are some common terms you should know that appear regularly
C/C: Counterclockwise.
C/W: Clockwise.
O/U: Over-Under, referring to the working end’s movement in relation to the cord it meets.
w-end: Working end—the end that is doing the majority of movement through the knot.
st-end or s-part: Standing end—the part of the cord that does not move when forming the knot.
Bight: Generally a 180-degree bend in a line. However, not all bights are 180 degrees.
Loop: An immediate crossing of one part of a line over itself.
Crossing: Where one line crosses over a different line, or different length of the same line (such as later in a knot’s construction).
Knot: Any confusion such as crossings, bights or loops in a piece of line, creating an object or shape.
Strand: A single section of line, cord, fiber, plastic, leather, wire, or other flexible material.
Working Surfaces:
Buy a board with a clip mounted at the top. This will serve as an excellent working surface. Another useful surface is corkboard or very firm fiberboard, to which you can anchor your work using T-pins. If you have to keep your piece under tension, try setting a temporary clamp or vise on the edge of a table (use cardboard or folded newspaper to protect the table surface), and use that vise to pull against to keep the tension even. You might even try adding a clamp to your belt and then attaching your piece to that clamp so that you can lean a little of your body-weight against it. I use a piece of 18x24-inch fiberboard when I must (most of my pieces I make in hand), which is large enough so that I can just prop it on my lap and lean it against a table with a good light over my shoulder. The chair I use is an upright dining room chair with nothing on it (arms, finials, leg-braces, etc.) to snag the line (VERY important). This type of chair is just comfortable enough for me to sit in for about forty-five minutes before I have to get up and stretch, walk about, and perhaps have a cup of tea before getting back to work. If I am working on a rail or a wheel rim on a boat or anywhere outdoors, I try to make sure I have an umbrella, hat, or some other shade to keep me out of the sun and rain. Whatever you use, make sure it is comfortable and that, no matter how comfortable it is, you get up and stretch at least once an hour.
TOOLS TO USE
A pricker is probably THE most useful tool. It is used to pull line, rope, cord, or twine through your knot work so that the tension on each piece is sufficient to ensure a smooth appearance. It will certainly save your nails from being chipped, cracked, and broken from trying to grip and pull a piece of cord through a tight spot. There are a number of ready-made prickers you can buy. I have several that I use, depending on what I am working on. All of them share a single feature: They are not sharp enough to penetrate the fiber I am working with, unless I really stab at it. The ends have a radiused or tapered point, but it is never sharp. If it were, it would pick up stray fibers and could even snag fibers that then could not be smoothed down again, which could wreck the finished look of the piece. To use a pricker, insert just the tip parallel to the cord you want to pull and then slide the tip under sideways, place your thumb on top of the cord, and, using the rest of your hand to grip the tool, press down with your thumb-tip enough so that you can grip the cord and pull it through. Try not to pull from too far away in the piece; instead, pull directly adjacent to the length that requires your attention. Pulling from too far away can stretch the cord without getting the piece you want in place. Below is a photograph of a pricker in use.
If you are making anything with particularly long cords in it, make the cords up into a bundle (or knittle, as it was once called). Start with the cord in your sub-dominant hand, palm facing you, with the tip of the cord at the pinky side of your palm. Make a turn up and around your outstretched thumb, counterclockwise if on your left hand, clockwise if on your right hand. Stretch out your pinky finger and wind the cord in the opposite direction around the pinky, making a figure-eight twist across your palm. Keep making figure-eight turns until you have
Note the thumb on top of the cord and the pricker tip under the cord. The pricker is held by the remaining fingers of the right hand. enough cord for the work you are going to do, then finish it off by slipping the coils from your thumb only and putting a Half Hitch around the center of the bundle before taking it off your pinky finger. Add a second Half Hitch in the same direction (making a Clove Hitch) around the center of the bundle. Now, find the end you started with and you can begin the work with that end. As you start to use up the cord, pull out one or two twists of the figure-eight bundle and retighten the Clove Hitch around the middle, to keep the bundle in place. You could use elastic bands if you do not know how to make a Half Hitch, but always start your piece with the end you started on your palm prior to winding around your thumb and pinky. You may even want to add a slip of paper or tape with a number or letter on it under the Clove Hitch or elastic band, to identify which knittle it is for later reference.
Here is a list of the tools that I have found useful in making knotted pieces:
Shears, the sharper the better
Sharp scissors in various sizes
Tape (drafting tape is best)
T-pins made of stainless steel
Squared pin-board used for project
Marlinespike, not essential but helpful
A hollow, steel fid
Flat-bladed and needle-nosed pliers
Medical forceps or hemostats
A small butane torch or lighter
CA glue, refrigerated
Clamps in assorted sizes
A vise that fits a table edge
Paper, pencil, and eraser, for drawing
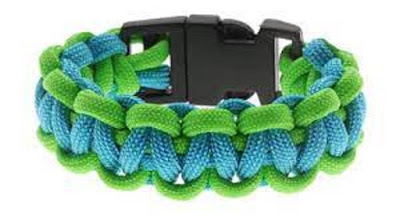
A jig for type of project working on, bracelet, monkey fist, key fobs.

MATERIALS, METHODS, AND TOOLS
There are too many places where materials may be obtained for me to show them all; you may find some other place near you that is a good source—just keep your eyes peeled for an opportunity! The Internet is a great resource in that respect. If you do not have Internet access, there is enough information in the back of this book to enable you to inquire by mail to one or more companies to start the ball rolling. If you take the initiative to join a group such as the International Guild of Knot Tyers, the International String Figure Association or the Basketmakers Guild, I feel sure you will find a contact, perhaps nearby, who can help you. Good luck!MATERIALS
Materials! I usually field many questions about materials when I demonstrate knotting. What should I use and where will I find some? Surely they don’t still make that, do they? What do I do with it when it is finished? Where should I store it? Does this stretch, shrink, burn, fade, or do anything else in reaction to stressors? What colors, finishes, types, and thicknesses are available? Are there special glues, lacquers, varnishes, or coatings that I should or should not use? These are all typical questions, and are proper for those starting out.There are many materials one can use to create knots and knotted articles. Artists have used everything from carbon fiber to hempen cord. A few of the more common materials are examined here. These are leather, cord, wire, line, plastic, and natural fibers. You will learn what to use them for and where to get them, how to treat something you’ve made with them, and any potential problems their use implies.
A word about the construction of cords and lines: Some are known as laid cords or line. These are cords made by twisting the original fibers into yarns. Those yarns are subsequently twisted in the opposite direction into strands. Then the strands are twisted together, again in the opposite direction, into lines or cords. The final twist may be described as left laid (known in the trade as S-laid because a left-laid cord’s strands appear to follow the stroke of the letter S) or they may be right-laid, which is the most common form (also known as Z-laid). You should note that cords may be simply described on the store shelves as twisted; you should examine this yourself to determine the way in which they were constructed.
METHODS
The question I’m asked most often is “How can I make these beautiful pieces?” First-time or novice knotters will say,“I have never done it before,” or, “You must have so much patience!” when they see finished works by others. Each of us starts at the exact same point—the point of being interested in what you see and wanting to make something like it for yourself. Experienced knotters are not blessed with any superhuman skills or abilities, we simply apply ourselves for the time it takes for us to get bored, tired, or annoyed with what we are doing and then we stop—just like everyone else! It is really not about patience, although having patience does help. It is more a question of determination, doggedness, and whether you want an end result that is perfect, near-perfect, or an interpretation. Do try to remember that this is supposed to be fun. Once it stops being fun, you can stop and come back to it later. The second most popular question is “How long did it take to make that?” This is an important thing to think about when making something for sale, but can be a little insulting when asked of someone who has just spent over forty hours making something for display. If you are making it for yourself or for a demonstration, the question is not quite as important, but for a novice, it is important to know how much time making something takes. Time is a common measure for many people and the question of how long it takes to make something can be translated to “How much time will this take away from something else I want to do?” so that the person asking can relate to what involvement they want to have or whether it is better to have someone else make the piece—maybe you! It also enables the person to place a value on what is being offered—if it takes an expert ten minutes to make something then some people will relate that to what they consider an appropriate hourly rate to be for the craft or art and determine what value they would place on the finished article. Something that took you eighty hours to make may not have the same value for the buyer, because they perhaps do not realize the time it takes to make something like this and they may be unaware of its complexity.Here are some common terms you should know that appear regularly
C/C: Counterclockwise.C/W: Clockwise.
O/U: Over-Under, referring to the working end’s movement in relation to the cord it meets.
w-end: Working end—the end that is doing the majority of movement through the knot.
st-end or s-part: Standing end—the part of the cord that does not move when forming the knot.
Bight: Generally a 180-degree bend in a line. However, not all bights are 180 degrees.
Loop: An immediate crossing of one part of a line over itself.
Crossing: Where one line crosses over a different line, or different length of the same line (such as later in a knot’s construction).
Knot: Any confusion such as crossings, bights or loops in a piece of line, creating an object or shape.
Strand: A single section of line, cord, fiber, plastic, leather, wire, or other flexible material.
Working Surfaces:
Buy a board with a clip mounted at the top. This will serve as an excellent working surface. Another useful surface is corkboard or very firm fiberboard, to which you can anchor your work using T-pins. If you have to keep your piece under tension, try setting a temporary clamp or vise on the edge of a table (use cardboard or folded newspaper to protect the table surface), and use that vise to pull against to keep the tension even. You might even try adding a clamp to your belt and then attaching your piece to that clamp so that you can lean a little of your body-weight against it. I use a piece of 18x24-inch fiberboard when I must (most of my pieces I make in hand), which is large enough so that I can just prop it on my lap and lean it against a table with a good light over my shoulder. The chair I use is an upright dining room chair with nothing on it (arms, finials, leg-braces, etc.) to snag the line (VERY important). This type of chair is just comfortable enough for me to sit in for about forty-five minutes before I have to get up and stretch, walk about, and perhaps have a cup of tea before getting back to work. If I am working on a rail or a wheel rim on a boat or anywhere outdoors, I try to make sure I have an umbrella, hat, or some other shade to keep me out of the sun and rain. Whatever you use, make sure it is comfortable and that, no matter how comfortable it is, you get up and stretch at least once an hour.
TOOLS TO USE
A pricker is probably THE most useful tool. It is used to pull line, rope, cord, or twine through your knot work so that the tension on each piece is sufficient to ensure a smooth appearance. It will certainly save your nails from being chipped, cracked, and broken from trying to grip and pull a piece of cord through a tight spot. There are a number of ready-made prickers you can buy. I have several that I use, depending on what I am working on. All of them share a single feature: They are not sharp enough to penetrate the fiber I am working with, unless I really stab at it. The ends have a radiused or tapered point, but it is never sharp. If it were, it would pick up stray fibers and could even snag fibers that then could not be smoothed down again, which could wreck the finished look of the piece. To use a pricker, insert just the tip parallel to the cord you want to pull and then slide the tip under sideways, place your thumb on top of the cord, and, using the rest of your hand to grip the tool, press down with your thumb-tip enough so that you can grip the cord and pull it through. Try not to pull from too far away in the piece; instead, pull directly adjacent to the length that requires your attention. Pulling from too far away can stretch the cord without getting the piece you want in place. Below is a photograph of a pricker in use.If you are making anything with particularly long cords in it, make the cords up into a bundle (or knittle, as it was once called). Start with the cord in your sub-dominant hand, palm facing you, with the tip of the cord at the pinky side of your palm. Make a turn up and around your outstretched thumb, counterclockwise if on your left hand, clockwise if on your right hand. Stretch out your pinky finger and wind the cord in the opposite direction around the pinky, making a figure-eight twist across your palm. Keep making figure-eight turns until you have
Note the thumb on top of the cord and the pricker tip under the cord. The pricker is held by the remaining fingers of the right hand. enough cord for the work you are going to do, then finish it off by slipping the coils from your thumb only and putting a Half Hitch around the center of the bundle before taking it off your pinky finger. Add a second Half Hitch in the same direction (making a Clove Hitch) around the center of the bundle. Now, find the end you started with and you can begin the work with that end. As you start to use up the cord, pull out one or two twists of the figure-eight bundle and retighten the Clove Hitch around the middle, to keep the bundle in place. You could use elastic bands if you do not know how to make a Half Hitch, but always start your piece with the end you started on your palm prior to winding around your thumb and pinky. You may even want to add a slip of paper or tape with a number or letter on it under the Clove Hitch or elastic band, to identify which knittle it is for later reference.
Here is a list of the tools that I have found useful in making knotted pieces:
Shears, the sharper the betterSharp scissors in various sizes
Tape (drafting tape is best)
T-pins made of stainless steel
Squared pin-board used for project
Marlinespike, not essential but helpful
A hollow, steel fid
Flat-bladed and needle-nosed pliers
Medical forceps or hemostats
A small butane torch or lighter
CA glue, refrigerated
Clamps in assorted sizes
A vise that fits a table edge
Paper, pencil, and eraser, for drawing
A jig for type of project working on, bracelet, monkey fist, key fobs.


Comments
Post a Comment