My Favorite Knot
Sinnets—what exactly are they?
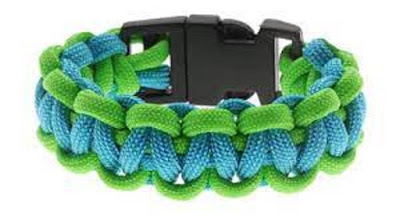
Sinnets, similarly, are somewhere between braids and plaits. A sinnet is a woven structure, frequently having several cords or strands, and usually adaptable to incorporating several colors and patterns. Sinnet is variously defined elsewhere as braided cord, plaited cord, or simply cords woven over and under each other. What seems important to me to understand is that sinnet is woven by making alternating passes of one cord (or several cords as part of a bundle) over and under the remaining cords in the bundle to form a flat, round, or other-shaped cross-section rope or long piece of ropework that is decorative, especially if made with several colors. A sinnet is therefore a structure that lends itself to multiple strands being woven together into multiple patterns and shapes, with a relatively simple repetitive activity of over and under. As with all seemingly simple pieces however, there are cautions. It can be easy to “drop a stitch” in making multiple-strand sinnets, which, if you want your sinnet to look right, means you may have a lot of undoing to do if you want to correct it. For that reason I highly recommend that you number or otherwise mark the ends of your strands, so that you will always be able to see which strand is going to be passed next.There is almost no limit to the number of strands that can be made or braided into a sinnet by hand. Asian braiders use a table tool with a hole in the center to braid complex patterns with hundreds of colored silk strands into beautiful braided cord for decorative purposes on kimonos, dresses, pillows, and other decorative items of clothing and furniture. The strands are weighted and the finished braid is brought through the center of the table, which is known as a marudai in Japan. The center (finished) braid has a weight attached to it so that it can be pulled naturally through the marudai to produce even tension in the finished braid as the individual packets of colored strands are being passed over and under each other. The name for the practice of making these braids or sinnets is kumihimo. There are many forms of sinnet throughout the world, depending on the fibers used and the final purpose of the sinnet. When you are making a sinnet for your own use, it may take a few practice sessions first to ensure that you produce an even amount of tension in the finished piece’s strands. Remember that the cord surface will exert friction on the other cords and that friction is overcome by the amount you pull on the individual cords. If you pull unevenly your sinnet may look lumpy and crooked and will vary in thickness. Overall you want to achieve an even appearance for most decorative work, because the sinnet is not really the center of attraction; instead, it is being used to enhance something else. If, however, you are making the sinnet the center of attention it will be perfectly acceptable to have an uneven appearance, so that you can highlight some feature of the sinnet more artfully.
As with most decorative work, it is your skills that will show through in the finished piece, so take your time to do a thorough job and do make sure to practice first, so that you can become used to the way the sinnet works for you. Although Graumont and Hensel include more than 400 types of sinnet in their Encyclopedia of Knots and Fancy Rope Work, I have included only three in this chapter: flat, round, and other shapes. There are many more forms of sinnet, with a great variety in the number and arrangement of strands or cords, and I encourage the reader to find them in some of the books noted in the bibliography included at the back of this book. Combinations of differently shaped sinnet are very effective means of transitioning a piece from, say, round to flat and back to round again. Color changes can be easily wrought by introducing a new piece of cord from the center of the round sinnet and then cutting out or hiding the replaced color. In this way it is possible to have a whole rainbow of color along a piece of sinnet for a stunning visual. You might also try using sinnets as a base for a lanyard, enhancing it perhaps with a Turk’s Head or a Pineapple Knot to cover the splicing or joining of the ends of the sinnet together. The piece of the lanyard that circles the neck should have a flat cross-section for comfort and, preferably, a breakaway stitching in it someplace to prevent accidental choking or strangulation if it is intended for a child or a person working on or around machinery or any other place it might get caught.
FLAT SINNETS
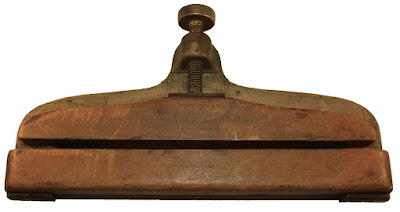
Flat sinnets are really a type of braid masquerading under a different name. If you have ever braided your sister’s hair, watched your mother or aunt braiding hair, or have braided a horse’s mane or tail, then you know the beginnings of sinnet work. Braids are usually made with three strands, woven over and through (sometimes under and through) the neighboring strand pair. Because we do not normally start a sinnet piece at a single event, like a head, neck, or tail, we have to start our sinnet with our strings/ cords attached together, either in a bundle or clipped together. Of course that means also that we could make a sinnet out of hair attached to a person or animal—it is just much more difficult to remove when it grows out a little—cornrows are a good example of what happens when hair is woven into sinnet or braids. Sinnets are usually made with four or more strands, and unweaving them when made of growing hair can present problems if not done carefully. Because flat sinnets are intended to lie flat, then of course we need to clip or hold them together with a flat clip. If you use a rubber band or a Constrictor Knot you will find that it takes several rows of work to get the sinnet looking flat and not distorted. I have used a clipboard (handy if you want to put a paper pattern under your work as a reminder during the making of the sinnet) and I have used a clip normally used for holding a sheaf of papers together (aka gorilla clip). You may also be lucky and have or be able to find a clamp like the one shown below.Some people prefer not to use anything at all to hold the starting strands, but instead knot their strands together with an Overhand Knot, with the Overhand Knot and the first few passes of cord being cut away at the finish of the piece before mounting it—again, be reminded that you will be doing extra work on flat sinnets if you gather the cords together in a bundle instead of keeping the cords flat.
The number of strands to make into a flat sinnet is limited only by what you can physically manage. Making a belt or scarf is possible, although by the time you achieve that width you are looking more at a process of weaving on a loom instead of making a sinnet by hand, which is what is being shown in this chapter. Certainly machine-made sinnet is possible in the form of belts and bags, but we are speaking here of handmade work, so we have not included the various machine-made pieces. Flat sinnets can also be made in a variety of patterns, instead of sticking with a standard over-one, under-one pattern. Here are a few types of flat sinnets for you to try.


Comments
Post a Comment